
How to Use Manual Auto-Cut Settings
Table of Contents
- Open Manual settings
- What each setting changes
- Tune settings for your recording
- Check the suggested cuts
sbb-itb-9696877
Open Manual settings
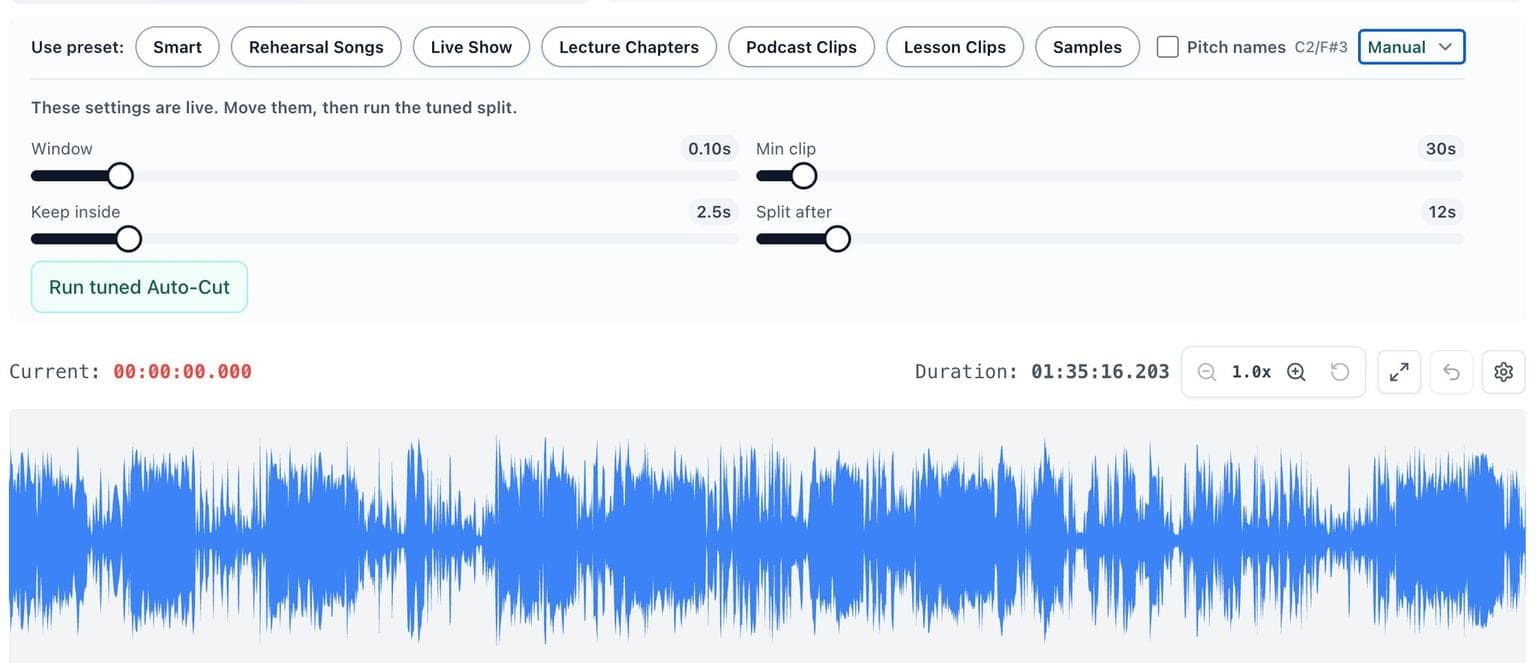
Start with an Auto-Cut preset that is close to your recording, such as Rehearsal Songs, Lecture Chapters, or Samples.
Then open Manual in the Auto-Cut panel.
Manual settings let you change four parts of the split logic:
- How closely AudioMultiCut reads the audio
- The shortest clip it can keep
- The short pauses that should stay inside a clip
- The longer pauses that should create a new clip
The settings are live, but they do not change your cuts until you select Run tuned Auto-Cut.
What each setting changes
Window
Window controls how often AudioMultiCut measures the audio level.
A smaller window reads the recording in smaller pieces. This can make cut points more precise, especially for short sounds or quick pauses.
A larger window smooths the reading. It can help when a recording has small changes in room noise that should not affect the result.
| Recording type | Useful direction | Why |
|---|---|---|
| Individual samples or notes | Use a smaller window | It can catch short gaps between sounds |
| Spoken recordings with steady room tone | Use a larger window | It smooths small background changes |
| Band rehearsal with clear pauses | Start with the default | The default is usually detailed enough without being overly sensitive |
The available range is 0.05 to 0.5 seconds.
Min clip
Min clip sets the shortest result that Auto-Cut is allowed to keep.
Raise it when Auto-Cut creates tiny clips from bumps, breaths, applause, or short bits of noise. Lower it when you need to keep short musical notes, one-shots, or brief spoken answers.
For example, a rehearsal recording may work better with a minimum clip of 30 to 60 seconds. A folder of drum hits may need a value closer to 0.6 seconds.
The available range is 0.2 to 600 seconds.
Keep inside
Keep inside controls the longest quiet pause that can remain within one clip.
If a pause is shorter than this setting, AudioMultiCut treats the audio on both sides as part of the same clip.
Use a higher value when normal pauses should stay together:
- A singer taking a breath between lines
- A teacher pausing briefly before the next sentence
- A band stopping for a quick count-in
Use a lower value when each sound should become its own file:
- Notes played one at a time
- Sound effects
- Short voice samples
The available range is 0.05 to 20 seconds.
Split after
Split after sets the minimum quiet pause that should create a new clip.
This is the main control for changing the number of suggested cuts.
Lower it to create more clips. Raise it to create fewer, longer clips.
| If Auto-Cut does this | Change this setting | Expected result |
|---|---|---|
| Keeps two songs in one clip | Lower Split after | More pauses qualify as a new cut |
| Splits one song into several clips | Raise Split after | Only longer pauses create a new cut |
| Splits during spoken pauses | Raise Split after | Short pauses stay inside the same clip |
| Misses separate samples | Lower Split after | Short gaps can create separate clips |
The available range is 0.1 to 120 seconds.
AudioMultiCut keeps Split after longer than Keep inside. That gap prevents a pause from being treated as both “stay together” and “split here.”
Tune settings for your recording
Change one setting at a time, then run tuned Auto-Cut again.
For a band rehearsal, start by adjusting Split after. If songs are being joined together, lower it a little. If applause, talking, or tuning breaks a song apart, raise it.
For a lecture or podcast, keep Keep inside high enough to preserve normal speaking pauses. Then set Split after high enough that only a real topic change creates a new clip.
For samples, use short values across the board:
- Small Window
- Low Min clip
- Low Keep inside
- Low Split after
That tells Auto-Cut to look for short, distinct sounds with short gaps between them.
Check the suggested cuts
Manual Auto-Cut suggests clips; it does not make your recording untouchable.
Listen to the suggested clips before exporting. If a cut is slightly early or late, adjust that clip manually. If the settings created too many or too few clips, change the relevant pause setting and run tuned Auto-Cut again.
The simplest rule is:
- Too many clips: increase Split after, Min clip, or both.
- Too few clips: decrease Split after.
- Short pauses are splitting clips: increase Keep inside.
- Tiny noise clips appear: increase Min clip.
Cut your recording into clean clips
Upload an audio file, mark the parts you want, preview every cut, and export the finished clips.