
Audiobook Chapters from 1 File: Export Guide
Yes - you can split one long audiobook file into chapter files in one session. I’d do it in four steps: map every chapter first, mark all cut points on one timeline, check each join, then export the full set at once.
Here’s the short version:
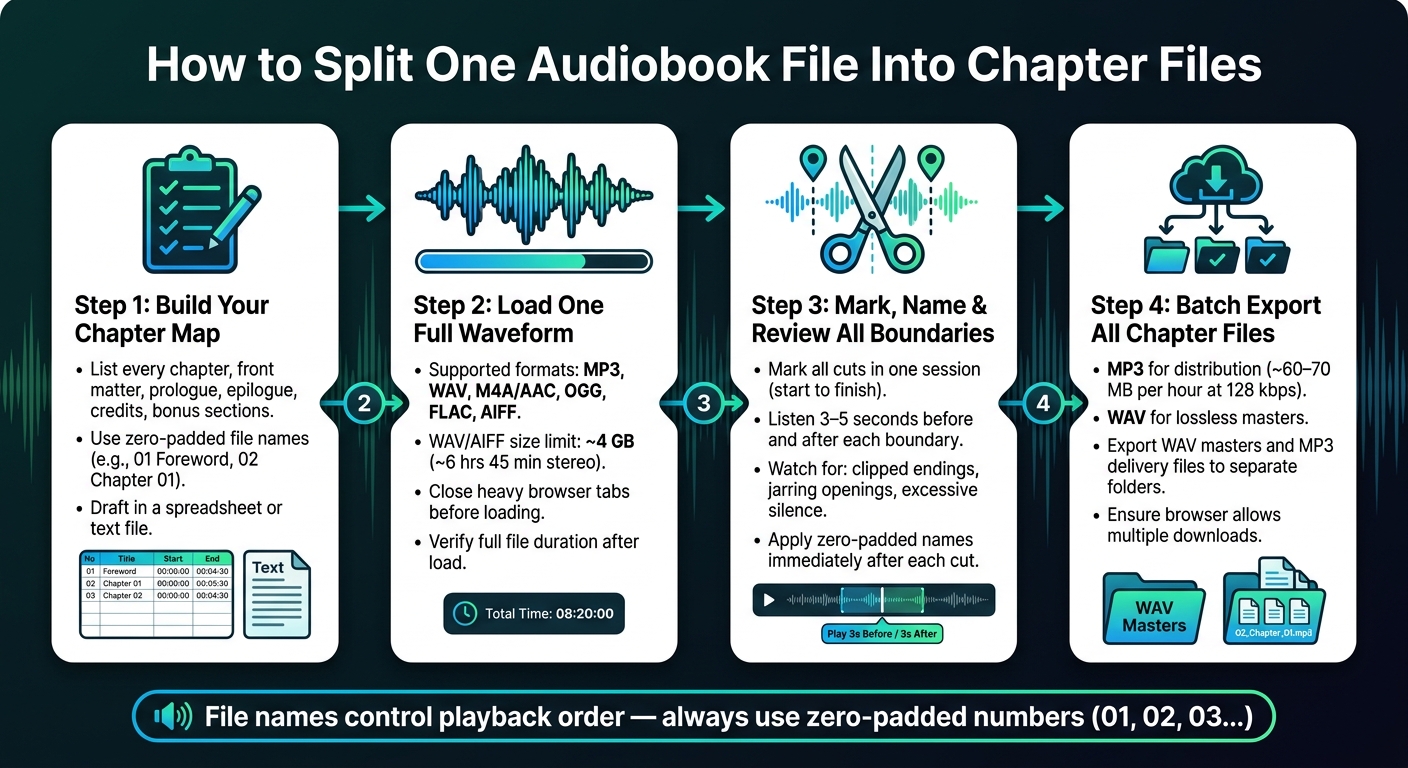
- I start with a chapter list, including front matter, prologue, epilogue, credits, and bonus sections.
- I use zero-padded file names like
01 Forewordand02 Chapter 01so files stay in order. - I choose between manual cuts and silence-based splitting based on the recording.
- I review 3–5 seconds around each chapter break to catch clipped words or long gaps.
- I export to MP3 for delivery or WAV for master files.
- If I’m prepping for ACX, I keep each file under 120 minutes.
- If the source is a standard WAV or AIFF, I watch the ~4 GB size limit, which is about 6 hours 45 minutes of stereo audio.
A few details matter more than most people think. File names control playback order. One missed label can put Chapter 10 before Chapter 2. And if your browser blocks multiple downloads, batch export may stop after the first file.
For a clean pass, I’d keep the workflow simple:
| Step | What I do | Why it matters |
|---|---|---|
| 1 | Build the chapter map | Keeps cuts and names in order |
| 2 | Load one full waveform | Makes gaps and overlaps easier to catch |
| 3 | Mark and review boundaries | Helps avoid clipped endings and rough starts |
| 4 | Batch export all files | Saves time and cuts repeat work |
The main idea is simple: do the prep first, make every cut on one timeline, and export once. That’s the easiest way to turn one long narration into a full set of chapter files without doing the same job over and over.
Audiobook Chapter Export Workflow: 4-Step Process Guide
2026 update: How to split audiobook file into chapters in audacity
sbb-itb-9696877
Plan Your Chapter Map Before You Start Cutting
Begin with a full chapter list, not the waveform. Build the chapter map first so the later cut, name, review, and export flow moves faster. Then turn that list into exact cut points on one waveform.
List Every Chapter in Order
Use your audiobook's table of contents as the starting point and list every chapter and extra section you plan to export. That includes numbered chapters, plus any front matter, prologue, epilogue, credits, or bonus sections you want to keep separate. If the recorded version doesn't match the table of contents, check the manuscript, eBook, spoken chapter breaks, or existing timestamps to confirm the order before you start cutting.
Keep forewords, introductions, prologues, epilogues, and credits separate when they should be skippable.
File naming determines listening order. Most players and file systems sort alphabetically, so add zero-padded numbers at the start of each filename. Set that naming plan now so export order stays right later: 01 Foreword, 02 Chapter 01 – Title, and so on. Draft the list in a spreadsheet or text file, then copy those names into your segment labels.
If you're getting files ready for ACX, keep each file under 120 minutes and split longer chapters into Part 1 and Part 2.
Once the map is set, load the full recording into one waveform.
Manual Cuts vs. Silence-Based Splitting: Which to Use
After your chapter list is ready, choose how you'll place the boundaries. Manual marking and silence-based auto-splitting can both work. The better option depends on the recording.
| Manual Cuts | Silence-Based Splitting | |
|---|---|---|
| Best use case | Varied narration, background noise, or music beds | Clean recordings with consistent, long pauses between chapters |
| Speed | Slower upfront, but predictable with a solid chapter map | Fast first pass on recordings where silence detection is reliable |
| Accuracy | Highest, because you place every boundary intentionally | Good starting point that still needs a review pass |
| Export control | Maximum control over every segment | High; auto-segments can be merged, split, and renamed |
If the recording has clear gaps between chapters, silence-based splitting can give you a strong draft fast. In AudioMultiCut, the Lecture Chapters preset is built to wait for actual section breaks instead of reacting to normal speaking pauses, which helps cut down on false splits. A matching preset will often get you most of the way there before you do manual cleanup.
Manual cuts are the safer default for most books. Emotional pauses, room tone, or music can throw off silence detection, so manual placement gives you tighter control when chapter changes depend on content instead of silence. Pick the method that gets you to accurate chapter boundaries with the least backtracking.
Load the Full Recording Into One Waveform
With the chapter list ready, the next step is simple: load the source file once and work from a single waveform.
Check File Format and Recording Length Before You Begin
Before you open the file, check the format and total length. AudioMultiCut supports MP3, WAV, M4A/AAC, OGG, FLAC, and AIFF. If your recording app exported a different format, you can re-export it as MP3 or WAV first.
Length is the main thing that can derail an import. Standard PCM WAV and AIFF files top out at about 4 GB, which comes to roughly 6 hours 45 minutes of stereo audio. If your audiobook is longer than that as a WAV, split it into two source files before you begin.
It also helps to close heavy browser tabs and background apps. Then jump to the end of the waveform and make sure the displayed duration matches what you expected. If the file stops early, it didn’t load all the way. That’s the kind of problem you want to spot NOW, not after you’ve already placed chapter markers.
Once the file opens without issues, you can place every chapter boundary on the same timeline.
Work From One Timeline for All Chapters
Using one timeline for the full book makes chapter work much easier. Every boundary stays in view, so gaps and overlaps stand out before they make their way into the exported files.
That setup is how AudioMultiCut works: load the full recording as one scrollable waveform, define as many named segments as you need, and keep processing local on your device. When each chapter segment has a name and clean trim points, one export pass creates all chapter files.
Next, mark each boundary and name each chapter before reviewing the transitions.
Mark, Name, and Review Every Chapter
Once the full recording sits on one timeline, mark each chapter break, name every segment, and check every transition before export. This is the moment to use your chapter map so each break and title falls into place in the right order on the first pass.
Place All Chapter Boundaries in One Session
Mark the boundaries from start to finish in a single pass. That helps you avoid skipped chapters, off-by-one cuts, and messy backtracking.
As you listen, pay attention to audio signals that usually mean a new chapter is starting:
- The narrator says something like "Chapter Five"
- There's a longer pause between sections
- You hear a clear closing cadence at the end of a section
When you spot one of those cues, set the end boundary for the current chapter and then place the start of the next one. Put cuts in silence when you can, leave a small bit of room tone at the end, and let the next chapter begin slightly early.
After you've marked the full set, go straight into naming while everything is still clear in your head.
Name Files So They Sort Correctly
Apply your planned zero-padded names right after each cut. That way, you don't have to stop later and figure out what each segment was supposed to be. For example: 01-Introduction.
If the book includes parts or appendices, set aside a numbering range for that extra material. Main chapters might run from 01 through 18, while appendices begin at 20-Appendix-A-Resources. That makes it obvious where the main story or argument ends.
Once the names are in place, do one clean pass just for the joins.
Listen to Each Transition and Adjust the Edges
Play about 3–5 seconds before and after every boundary. You're listening for three common problems: a clipped ending, a jarring opening, or too much silence.
If the last sentence sounds rushed, move the end boundary a little later. If the next chapter starts on a breath, shift the start boundary a little earlier. With an online audio cutter, you can audition each boundary on the spot and make small edge fixes without leaving the session.
When the joins sound clean, you're ready for batch export.
Export All Chapter Files at Once
Once you've marked and checked every chapter on one timeline, export the whole set in a single batch. That saves you from trimming and downloading chapters one by one. You kick off one export, and the app renders the full set for you.
Choose MP3 or WAV and Save the Full Set
Pick the format based on what happens next.
MP3 makes sense for distribution. A one-hour chapter at 128 kbps is about 60–70 MB, which makes it easy to sync, stream, or share. WAV is the better fit when a publisher or audio engineer needs lossless files, or when you want an uncompressed master file to keep on hand.
A simple setup works well:
- Export WAV masters to one folder
- Export MP3 delivery files to another
Do that in the same pass. Before you start, make sure your browser allows multiple downloads. If it doesn't, batch export may stop after the first file.
In AudioMultiCut, each named segment turns into its own file using the labels you've already set. The iOS app also includes saved projects and native batch export. That's handy if you recorded on an iPhone and want to segment and export the full chapter set without moving the file to a desktop first.
Conclusion: A Repeatable Workflow for Audiobook Chapters
Plan the map, mark every boundary, name each file, review the joins, and export once.
FAQs
How do I split a very long audiobook safely?
Use AudioMultiCut right in your browser, so your audio stays private and never has to leave your device.
Start with Auto-Cut to find chapter breaks based on silence. Then listen to the beginning and end of each segment to make sure no spoken words get cut off. From there, you can rename chapters, remove any segments you don’t want, and batch export the finished files.
What should I do if chapter breaks are unclear?
Don’t trust the first automatic splits on their own. Take a minute to check the start and end of each segment in the waveform preview, then use focused playback to hear the cut points. If something feels off, move the boundaries a bit, merge clips that were split in the wrong place, or cut them again where they belong.
In AudioMultiCut, use Manual override to change Split after, then run Auto-Cut again. You can also delete obvious dead air or junk segments and rename clips before export.
Should I export audiobook chapters as MP3 or WAV?
Use MP3 for sharing, uploading, or a quick follow-up. The files are smaller, so they’re easier to send, post, and store.
Use WAV only if you plan to do more editing, production work, or sample mapping later. If your exported chapters sound too quiet or uneven, normalize each one on its own with a dedicated volume tool after export.
Related articles
Cut your recording into clean clips
Upload an audio file, mark the parts you want, preview every cut, and export the finished clips.